Welcoming autumn the right way.
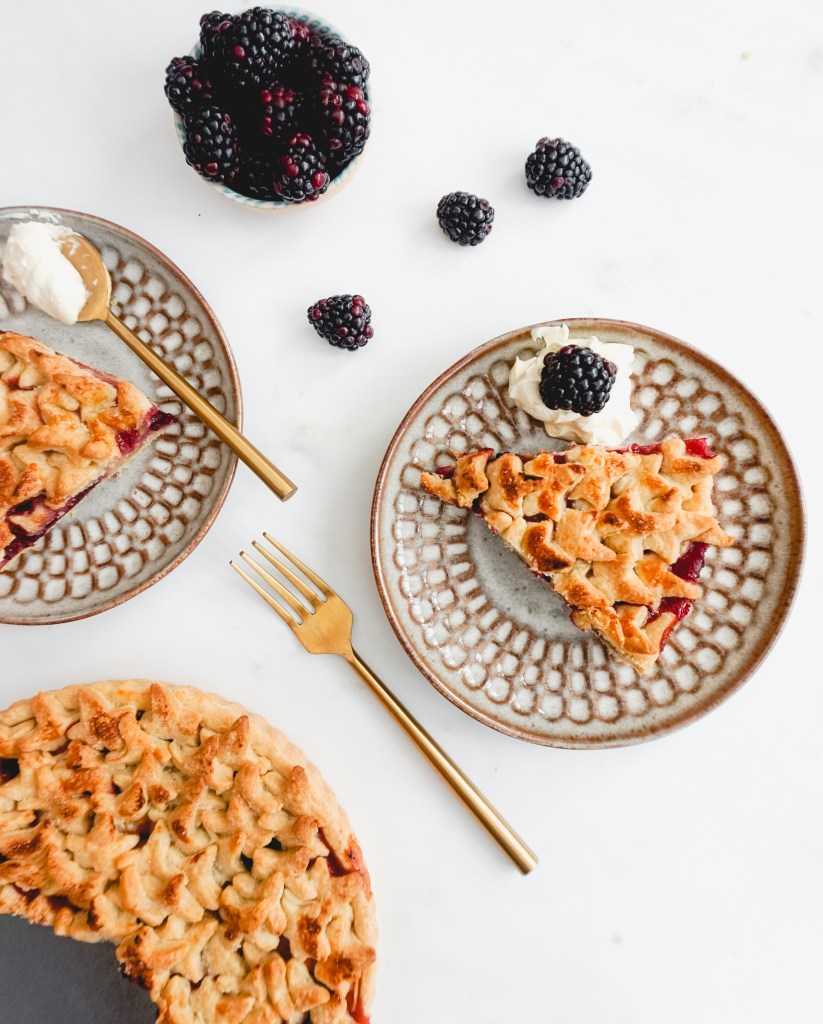
It was only yesterday when I was talking about how happy I am that autumn is coming and pies are yet another reason why. I am really planning on getting creative with them this autumn and this apple and blackberry pie is just the start.
Now, I know autumn doesn’t officially start until Wednesday, however, I am ready to let go of summer and embrace the leafs falling, the cosy knitwear and the comforting food.
I think the great thing about pies is all the possibilities you have with them, you can fill them up with whatever you like and it will just work. I think this is something recurring in my recipes that I know I keep mentioning, but there is nothing better than a recipe you can customise to your taste!
This pie is very easy to make and it doesn’t take very long. I choose to decorate it with some leafs just to get into the autumn mood, however, you can keep it a lot simpler than this. All you need for this pie is butter, water, flour, salt, agave nectar, vanilla extract, lemon, apples and blackberries.
About the pie crust
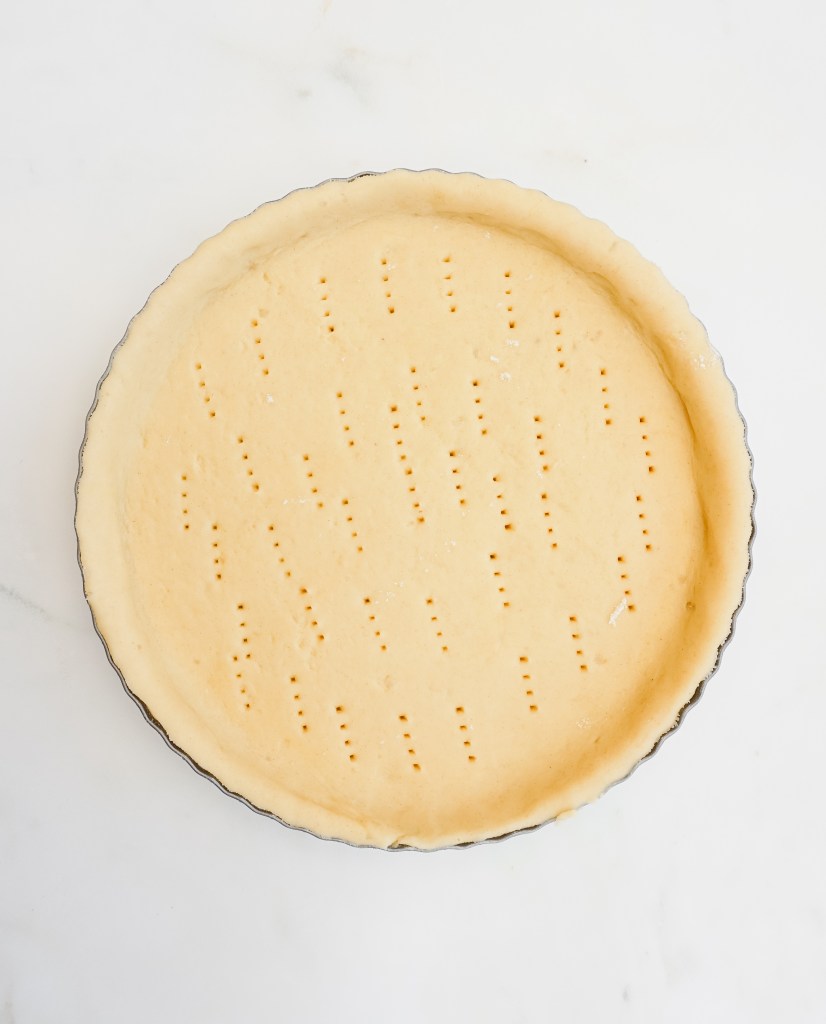
The first thing to do with this crust is the crust, this crust is lovely and buttery and super easy to make. All you have to do is mix the flour, water, butter and salt in a food processor and pulse it until it forms. If you don’t have a food processor, you can use a fork and your hands.
One of the keys to being successful at making a crust is using proper butter, the butter needs to be hard when you use it and since you will chill the dough later on, it needs to be able to go back to that hard state when you put it back in the fridge, otherwise, it will just be too soft and it will be very hard to handle.
Another thing is the water, first, the water needs to be cold, and secondly, it needs to be added slowly, using all the water at once may make your pie crust a bit too runny and you won’t be able to use it again.
Something else that I do with my pie crust is I brush the bottom of it with egg white, that will prevent the bottom of your pie from being soggy.
If you have extra pie crust, you can always freeze it and use it for future pies!
About the decor
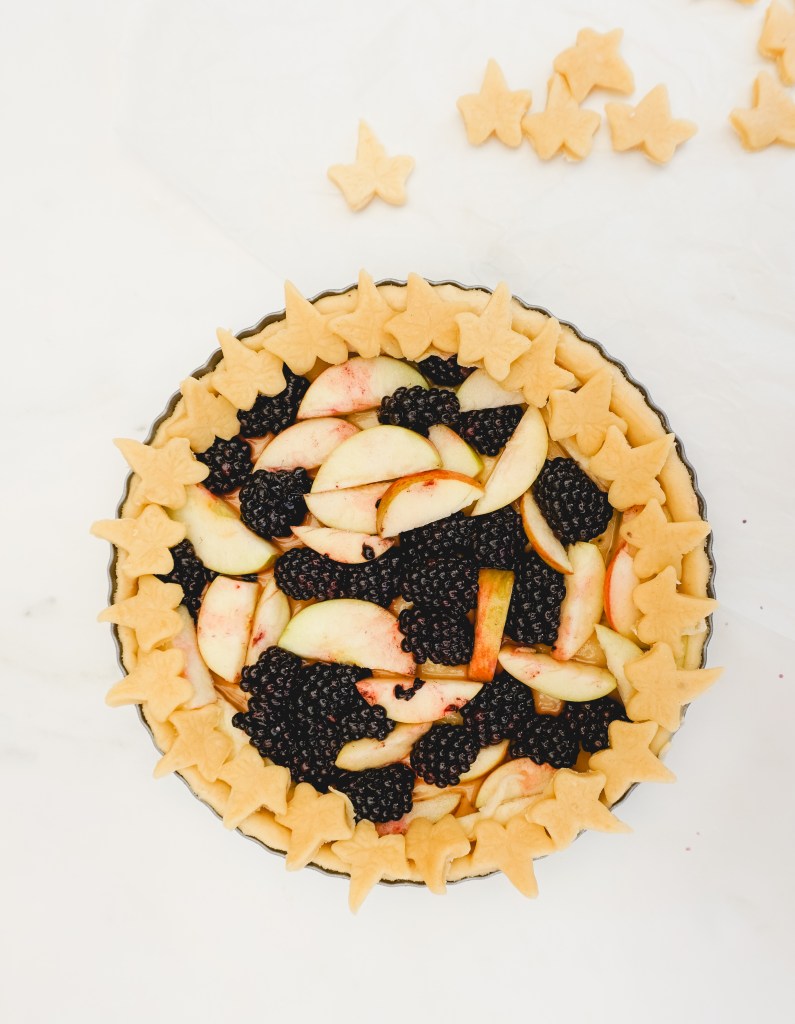
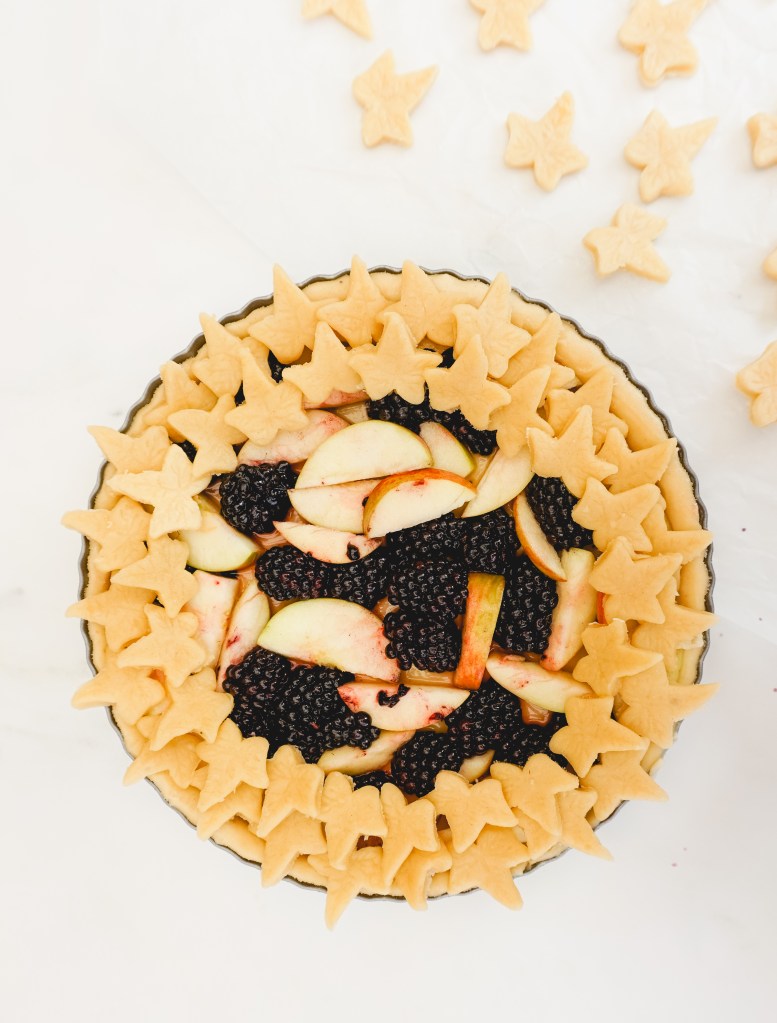
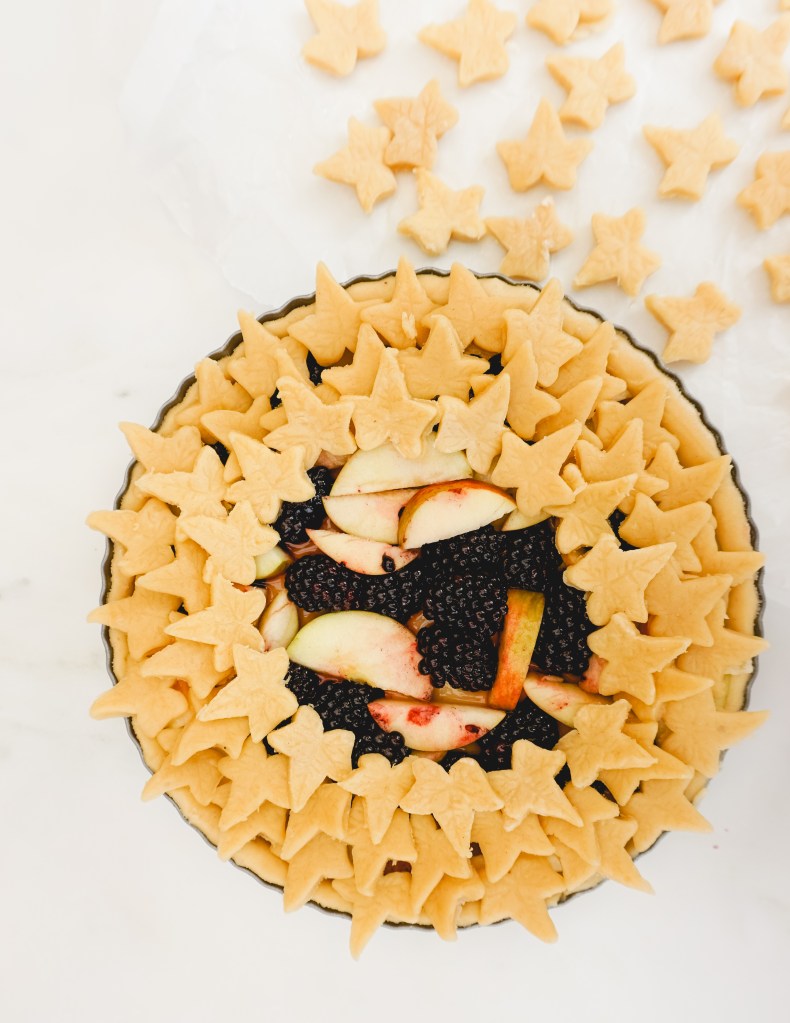
As I mentioned above, I chose to get creative with my pie and do leaf shaped decorations. You can just do something else if you are in a rush or simply have a different ideas. You can get lots of ideas from pinterest if you are not feeling very inspired!
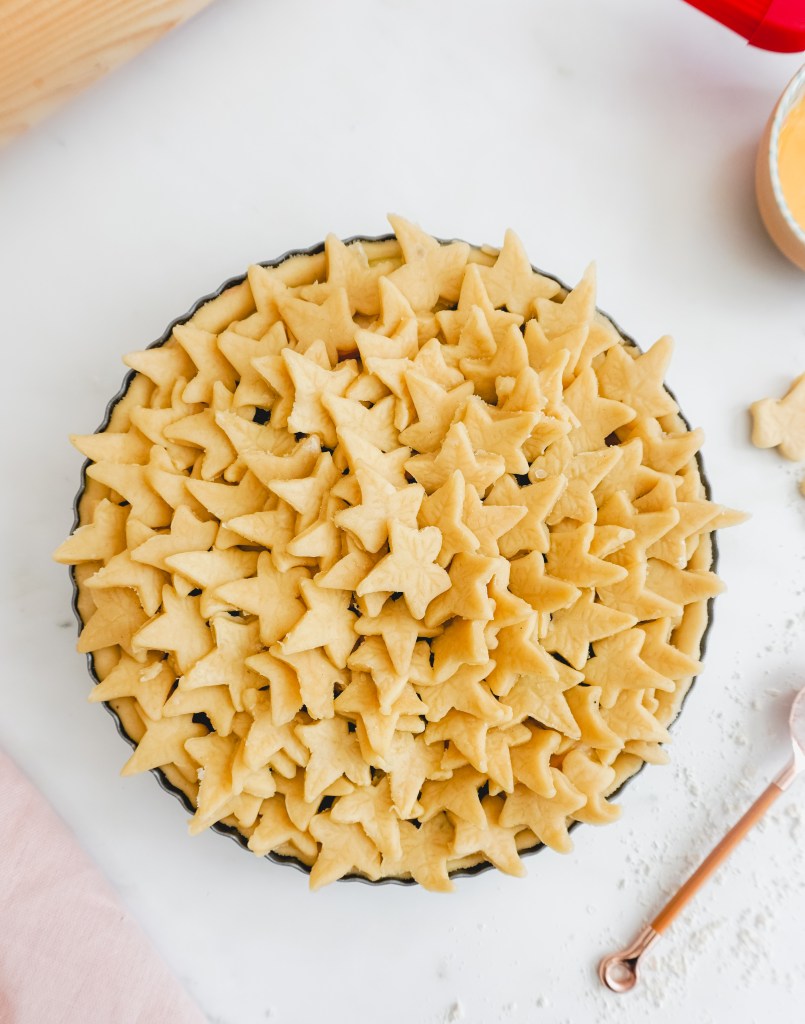
With regards to what I used to make my leaves, this was just a leaf cutter that I found on Amazon, I will not link it or recommend it because it actually broke as I was using it. But I am in the look for another one which I will link once I find it and I make sure that it actually works. I arranged mine in circles starting from the outside all the way to the center. I overlapped them so there was no space and I actually added some spare ones once I finished to cover any gaps.
A top tip when making a pie with small elements and that may take a while to make is to freeze the decor so it doesn’t melt while you are assembling it, if they do get soft, I would recommend freezing again the whole pie before cooking it, that will help the decor not lose its shape while it’s being cooked.


And now the filling
The filling of this pie is just two of my favourite fruits, apples and blackberries. I think they are a killer combination and the way my kitchen smelled while it was cooking… It is a big shame I cannot share smells through here!
I decided to make my pie sugar free because the fruit is sweet enough and a bit of agave did the job for me. However, you are more than welcome to add sugar to the apples if you have a sweeter tooth!
I used lemon juice on my apples to keep them fresh while I was assembling it.
With regards to the apples, I used apples from my apple tree, you can get baking apples or

You can serve this pie hot or cold with cream, custard, some lovely ice cream or simply eat it on its own, it will be delicious!
Apple & Blackberry Pie
Ingredients:
For the crust:
- 320 gr of flour
- 227 gr of cold butter cut into cubes
- 1 tsp of salt
- 6-8 tbsp of cold water
- 1 egg white
- 1 egg yolk
- A splash of milk
For the filling:
- 3 – 4 medium apples
- 125 gr of blackberries
- 1 tbsp of agave nectar
- The juice of half a small lemon
- 1 tsp of vanilla extract
Process:
- To make the crust, mix the butter, flour and salt in the bowl of a food processor, then, add 6 tablespoons of water and start pulsing, if the mix feels dry, add another tablespoon and pulse again. Do not add 7 or 8 tablespoons at a time as your crust may become too runny and you won’t be able to use it.
- Once the crust is ready, use your hands to turn it into a compact ball, wrap it up in some cling film and chill it in the fridge for 30 minutes.
- After 30 minutes, cut it in half and roll it into a circle on a floured surface. Put the crust on a greasted round tart pan and cut any excess. Keep the excess as it can be used for the crust.
- Use a fork to make tiny holes on the crust and put it in the fridge until you need it.
- Now make the top, I did mine with a leaf shaped cutter that I bought on Amazon. I will not link it here as mine broke while I was using it. If you want to do the same, roll the remaining amount of dough into a flour surface, the crust about – 2 mm thick. Using your cutter, cut about 60 leaves. Once you run out of space on the rolled crust, simply turn it into a ball again and repeat. You should have enough for all the leaves. Make sure the surface is always properly floured so they don’t stick to it.
- Freeze the leafs for 30 minutes.
- Just before the 30 minutes, prepare the filling by simply mixing in a bowl the apples cut in wedges, the blackberries (I cut mine in half as they were quite big), the lemon juice, the agave and the vanilla. Mix well.
- Take the pie crust out of the fridge and coat it with the egg white. Then add the fruits and their juice, the egg white will prevent the crust from going soggy.
- Take the leafs out of the freezer and start assembling the pie. I arranged mine in circles starting from the outside all the way to the center. I overlapped them to avoid any space in between them.
- Once you have finished, if the leaves feel soft, pop the pie back in the freezer for 15 minutes until they are hard again. This will also help them keep their shape while cooking.
- Mix egg yolk and a splash of milk and coat the pie, try to avoid the edges of the leaves and the edge of the pie.
- Place the pie in the bottom shelf of a preheated oven at 200 degrees celsius and cook it for 45 – 50 minutes, until the top starts to brown and the filling is bubbling. I would advise to use some foil for the edges of the pie for the first 30 minutes and then uncover it fully. If the top gets to brown but the filling feels undone, cover the whole pie with foil.
- Serve hot or cold and enjoy!
NOTES:
For this pie I used a 22cm/8.6inch round tart pan with loose bottom.
